Pages

Thursday, November 29, 2012

Cooking with Spelt


My mother asked me why is it that people have been eating gluten forever and yet just recently have been having problems. Well, the answer to that is that wheat we are ingesting today is nowhere near what wheat started out to be. 

I am definitely not an expert on it, but I do know that wheat (along with lots of other things) has been manipulated (whether hybridized or genetically modified) to the point that it is no longer the same wheat our ancestors (or even our grandparents) ate.

Anyway, I have been attempting gluten free, but decided to play around with spelt today. What is spelt? Basically, it is the "antique wheat". Click here to read up on it a bit.


So, here is what I did today:

Spelt Banana Spice Cake

2 1/2 cups Spelt Flour
2 1/2 tsp Baking Powder
1/2 tsp Baking Soda
1/2 tsp Salt
2 tsp Cinnamon
1/2 tsp Cloves
1 tsp Nutmeg
1/2 cup Butter
1/2 cup Honey
1/2 cup  Pure Maple Syrup
1/2 cup Brown Sugar
2         Eggs
1 Tbsp Vanilla
3         Large Ripe Bananas, mashed
1         Large Banana, sliced


  • Preheat oven to 375
  • Mix spelt flour, baking powder, baking soda, salt, and spices in a mixing bowl.
  • In a separate bowl, beat butter, honey, brown sugar, maple syrup, vanilla, and eggs with an electric hand mixer until fluffy.
  • Add a third of the bananas and beat well. Follow with a third of the dry ingredients. Repeat until all ingredients are mixed.
  • Pour half the batter in a 9x9, greased baking dish.
  • Place the slices of banana on the batter.
  • Pour the rest of the batter on top of the sliced bananas.
  • Bake for 35 minutes or until a toothpick comes out clean.
  • (I actually ended up turning it down to 350 for a bit to finish it off.. the 8x8x2.5 pan made for a deep cake!)
This cake had RAVE reviews by EVERYONE who tried it.  Most people would take a bite and then their face would show surprise as they tasted it. 

I'm going to try it again as a bread loaf and maybe see if it turns out differently with regular flour.


Never Ending Vanilla Extract

Today I went to try a recipe for Spelt Banana Spice Cake and, of course, the last ingredient to be added is the vanilla. The recipe calls for 1 Tablespoon and I had less than a teaspoon in the bottle!  

I decided this is a great time to start my own vanilla extract. I had read about this a few months ago (if I had started it then, I would have had my own by now..... ).

All you need is some sort of hard liquor (vodka, rum, whiskey) and a vanilla bean!  I had vanilla beans, but alas no liquor. Since I had to go to the store for vanilla anyway and there happens to be a liquor store next door, I stopped in and got a couple of the cheapest nips of vodka I could get.  Just 75 cents a piece for about 2 ounces. Of course I had already torn off the lables when I decided to take a picture.


Anyway, all you need to do in order to make your own Never Ending Vanilla Extract (we will see what the definition of "never" is at some point) is:


  •  take 1 vanilla bean per 4 ounces of liquor (I had 2 halves which worked out perfectly since I had 2 2 ounce bottles ) 
  • Split the bean down the middle (but leave the top and bottom in tact .. so don't split it ALL the way.. just the middle of the middle.. does that make sense?
  • You submerge the vanilla bean in the liquor (make sure it is covered by the liquor at all times
  • Store it in a cool, dark place and shake every few days for at least 6 weeks.The longer you let it stand the more intense the flavor will be.
Now, here is the "Never Ending" part.  You can TOTALLY reuse the vanilla bean! So, start 2 bottles (or start one then in a few weeks start the next) and when you get low on the first bottle, just add more liquor and start the process over again!

The vanilla beans I had were from a recipe that called for only the seeds out of half a bean, so I had one half that had had the seeds scraped out already. I marked the bottles with the date and "new bean" and "old bean" and we will see how it turns out!  


Wednesday, November 28, 2012

And for my next trick... Butter!

You know how proud you get when you make something from scratch? (And I don't mean "scratch the box open"!) 
Well, it's exponentially more exciting when you have not only made the recipe from scratch, but you have also created your own ingredients!

When I made my Quinoa Apple Muffins, I was so proud that I had made my own quinoa flour!  In fact, I ordered a grain grinder to make this process easier!

Well, now I have decided that I will make my own butter. I have made butter before, many times in fact. For a few years when my kids were younger, we had a tradition that for Thanksgiving the kids would make the butter for the meal. It was so easy, just take heavy whipping cream and put it in a baby food jar and let the kids shake it until it turned into butter! I actually prefer the "shake it in a jar" method over the butter churn. 

Since I am getting so very all about the whole "no additives" etc thing, I decided to search out where I might be able to get some whole fat, no additive cream. This lead me to this site where I might be able to get raw milk. 
not my own pic.. that will happen when I do it :)

I have decided to contact Oake Knoll (or is it the Lawton Family Farm) to make an appointment to get raw milk! I'm so excited. In the meantime, it looks like I would just be getting the milk and would then get to go one step further into the "making my own ingredients insanity" and have to make my own heavy cream!

I have sent an email to make an appointment, and I can't wait. I will be able to make, not only my own butter, but heavy cream and buttermilk too!

This will definitely have a follow up blog or two. I was just so excited, I wanted to share right away!

Sunday, November 18, 2012

Easy Peasy Applesauce.. have I mentioned how much I love my food mill?

When I went to make my Quinoa Apple Muffins, the recipe called for applesauce and, of course, I had used up mine just last night. But, have no fear, I have a billion apples in the house right now thanks to the discount produce rack at the supermarket. 

I am not sure what criteria they are using to choose which apples need to go on the discount rack, but I hope they don't change!  I think I have come across maybe 2 apples that even have a bruise on them. They have discounted these amazing apples to .49 cents a pound! All kinds! I am getting honeycrisp, gala, granny, even organic! So, anyway, I have a plethora of apples in the house right now. The dehydrator has been going non stop!

That having been prattled on about, I made applesauce for the recipe and decided perhaps I would share. 

I decided I would just make a small batch since I just needed a half cup for the recipe, but I would make enough to fill the jar I had just washed. 

I used 3 different kinds of apples. Grannysmith, Gala, and an organic Braeburn. I used my apple correr slicer thingymajiggy. This is all I do for when I dehydrate apples too. I don't bother peeling them.


Anyway, here is how I made this batch. I can't really say it's a "recipe" as there isn't really any set proportions. 


  • 3 large apples cored and cut (I don't bother to peel them as I use a food mill to process them which leaves the peels behind)
  • about 1/4 cup water (you really only need a smidget as the apples themselves will usually have enough liquid)
  • about 1/4 cup maple syrup
  • about 1/2 tsp (or so) cinnamon


Core and cut the apples into large chunks. Put them into an appropriately sized sauce pan with water and maple syrup and cinnamon. You can totally use sugar, you can omit any sweetener at all. I actually usually don't use any sweetener as I think the apples are sweet enough. 

Bring to a boil, then lower to a simmer for about 15 minutes until the apples are nice and soft. If you find that there is an excessive amount of liquid, just pour it off (I actually usually save mine and drink it like cider!) Let it cool a bit then I used my food mill to squish it all into applesauce consistency. In the past I have mashed the apples with a masher, used a potato ricer, pushed it through a sieve, and sometimes, just kinda mushed them with a fork and left chunks. 

Applesauce is one of those great things that you can play with as much as you like. You can make it thicker, thinner, smoother, chunkier, blander, spicier. You can add other fruits, leave the peels, pre-peel. You can even make an individual serving by just coring and apple and cook it in a micro safe bowl in the microwave for a couple minutes with a couple tablespoons of water in the bottom of the bowl. After a just 2 minutes (usually) you can take it out and mash it up with the sweetener and spices of your choice.
Have fun with it!


Quinoa flour? What!? My try at Quinoa Apple Muffins

I just LOVE when I make a recipe from scratch, and end up having to make the actual INGREDIENTS from scratch too!

I can't remember now what I was looking for, but came across a recipe for Quinoa Apple Muffins.  I am trying to go the way of gluten free, and so this intrigued me. I have quinoa on my shelf... I have apples... I like muffins... hmmmmmmmmm

Well, the recipe called for quinoa flour. THAT I did NOT have on my shelf, but... I DO have my handy dandy trusty coffee grinder that I use for EVERYTHING!  SOOOOOO I made myself the flour.  The original recipe called for 2 1/2 cups of it, and I really didn't want to use up that much in case it turns out to be like the dandelion soup (a whole story for another day). So, I decided I would halve the recipe. It seems that a half cup of quinoa ends up yielding about 3/4 cup of quinoa flour. 

The recipe also called for applesauce. Of course I used the last of my applesauce just yesterday and had just washed out the jar. That was definitely not a big deal since I have a HUGE supply of apples at the moment. So, I made some applesauce and used 3 different types of apples and maple syrup instead of any sugar. (oh, and for the record, I always only use PURE maple syrup... the other stuff isn't even anything maple .. its just grossness)

The original recipe also said something about how it probably wouldn't rise, and so to fill the tins right to the top. Well, my Acorn Banana Bread raised nicely and that had both baking powder and baking soda in it. This recipe only called for baking soda, so I decided I would add in some baking powder also. 

I think that was the right choice :)


Ok, so here is what the recipe ended up being:

  • ½ cup apple sauce
  • ¼ cup olive oil (original recipe called for vegetable but I don't have any)
  • 1/3 cup PURE maple syrup
  • 2 eggs
  • 1 small grated apple
  • ¼ vanilla
  • 1¼ cup quinoa flour
  • 1 tsp baking powder
  • 1 tsp baking soda
  • ¼ salt
  • ½ tsp cinnamon 

Preheat oven to 350°F/175°C.


Mix together oil and maple syrup. Beat in eggs. Stir in applesauce, grated apple and vanilla.

In a separate bowl, stir together the remaining dry ingredients. Add dry ingredients to wet mixture, and stir by hand until well combined.

Pour into a greased or lined muffin tray 3/4 full. 

Bake for 30 minutes or until an inserted toothpick comes out clean.

So, they rose nicely, the consistency is PERFECT! They are not crumbly or anything!  I think perhaps a smidge more salt maybe, or I might try using butter instead of oil, or half oil, half butter. 

Mom gave it a good review. In fact I had to send her away and tell her she couldn't have anymore!


original recipe

Wednesday, November 7, 2012

Acorn Banana Bread


Acorn Banana Bread

1 cup acorn flour
2 tsp baking powder 
¾ cup corn meal
½ tsp salt 
¼ tsp baking soda 
1/3 cup butter, softened
2 eggs, beaten
3 bananas, mashed
1/3 cup maple syrup 
¼ cup honey


Grease an 8x4 inch loaf pan. Preheat oven to 350° F. 
In medium bowl sift all dry ingredients. Flour, corn meal, baking powder, salt and baking soda.
Mix eggs, butter, bananas and honey in large bowl and slowly add flour mixture and beat until well blended. 
Pour batter into greased loaf pan and bake about 50 minutes to 1 hour, or until toothpick inserted in the center of the loaf comes out clean.


 (You can also use wheat flour instead of acorn flour. Also walnuts or pecans in place of acorns and it’s still delicious).

I used the mix of honey and maple syrup because well, I only had 1/4 cup of honey. So, I think it came out a bit sweeter than a straight honey recipe would. If you are going to use just honey, use 2/3 cup. 

It's a little crumbly, which I believe is because it is gluten free. I might look into adding things such as xantham gum, arrowroot, or.. maybe just another eggwhite!  

I used my mother, my son and one of his friends as taste testers and they all liked it a lot. When the boys were told what it was they were REALLY impressed and said "Well knowing what it is, it REALLY is good!"

Monday, November 5, 2012

Unacceptable Levels

I look forward to seeing this, although I'm sure it is going to be pretty scary! 


Check out their home page at Unacceptable Levels <- click that


Saturday, November 3, 2012

Toothpaste.. it's not just for teeth!

So, one of my friends had posted on Facebook that her husband was going to "polish her headlights ;)" and she posted the product he had purchased. Well, I'm a .. well let's just say I'm frugal and would love to share my frugality with everyone! 

And so was born, the "Polish your headlights with toothpaste" blog!

I remembered that my mother is always complaining that her headlights just aren't bright enough, so in the fading November sunlight (and temperatures!!) I went out to check out if her lenses looked like they were foggy, and lo and behold! They were!

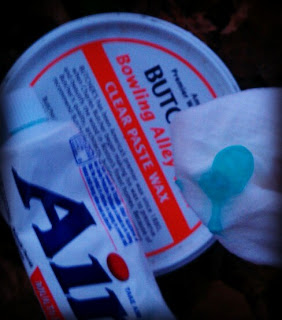
So with some products everyone has at home, it took me about 10 minutes (I kept the time stamp on most of the pictures to show how long it took) to complete! (And I was glad cause it was getting COLD AND DARK out there!) Toothpaste (whatever I had in the medicine cabinet) and wax (I happen to have butchers wax, but you can use anything including furniture spray)

Start out with an old, hazy headlight lens.  I happened to have  a  couple here on my mother's 1994 Toyota Corolla.


Just put some toothpaste on a damp papertowel and .. well.. polish the lens. Ya know, kinda "wax on ~ wax off" style. 


Wipe off the toothpaste, then go over it with actual "wax on ~ wax off"   (which means.. put on the wax.. and then .. polish off the wax.. not just the motion..)
Looks good so far!

Before..... 

After!!


Thanks for the blog idea.. and my mom thanks you too!!